
- SMB’s to eCommerce


Intro
Since 2001, Mailchimp has focused on supplying small businesses with email marketing tools and resources to grow and compete with larger competitors with much larger budgets. Its client base consists of millions of businesses, spread over more than 175 countries worldwide, who together send more than 6 billion emails every week.
Mailchimp’s “always-on” platform offers advanced automation options to significantly relieve its users’ marketing workload by reducing manual efforts. Once set up, automation will run independently, welcoming new customers, offering product recommendations, being attentive (birthday wishes, anniversaries), rewarding loyalty, re-engaging with out-of-touch customers, and so forth – generally taking customers by the hand on their path to purchase. On top of that, tracking and reporting options will tell users exactly how their campaigns perform: weaker aspects that need improvement and strong points that can be further developed. The ultimate goal being business growth.
Mailchimp offers a wide range of integrations and apps to make efficient use of the business and marketing tools you already use and give them a purpose in a marketing automation setting. The email marketing software offers a set of design tools that give clients great options to be creative with their emails without having to develop design skills first. On top of that, Mailchimp helps its clients to learn from their efforts by offering them insights in the success rate of their past campaigns and personalized advice for the next one.
To help you get started and/ or to overcome problems, the Mailchimp website contains a special section, “Resources”, that contains guides & tutorials, marketing tips, success stories and a special section you can check if you’re a new customer and want to get going with the system (“Mailchimp 101”).
CRM
Mailchimp’s dashboard consists of several sections, including Lists. CRM related tasks happen here. An overview of the available options:
- Create and manage lists
- Combine lists
- Create a signup form
- View and edit lists
- Import lists/ contacts
- Tag contacts
- Add new contacts
- Create segments
- View contacts history
- Check statistics
- Export lists/ contacts
- Import lists from other services
- Add social data to contact profiles
- Check Mailchimp traffic stats in Google Analytics
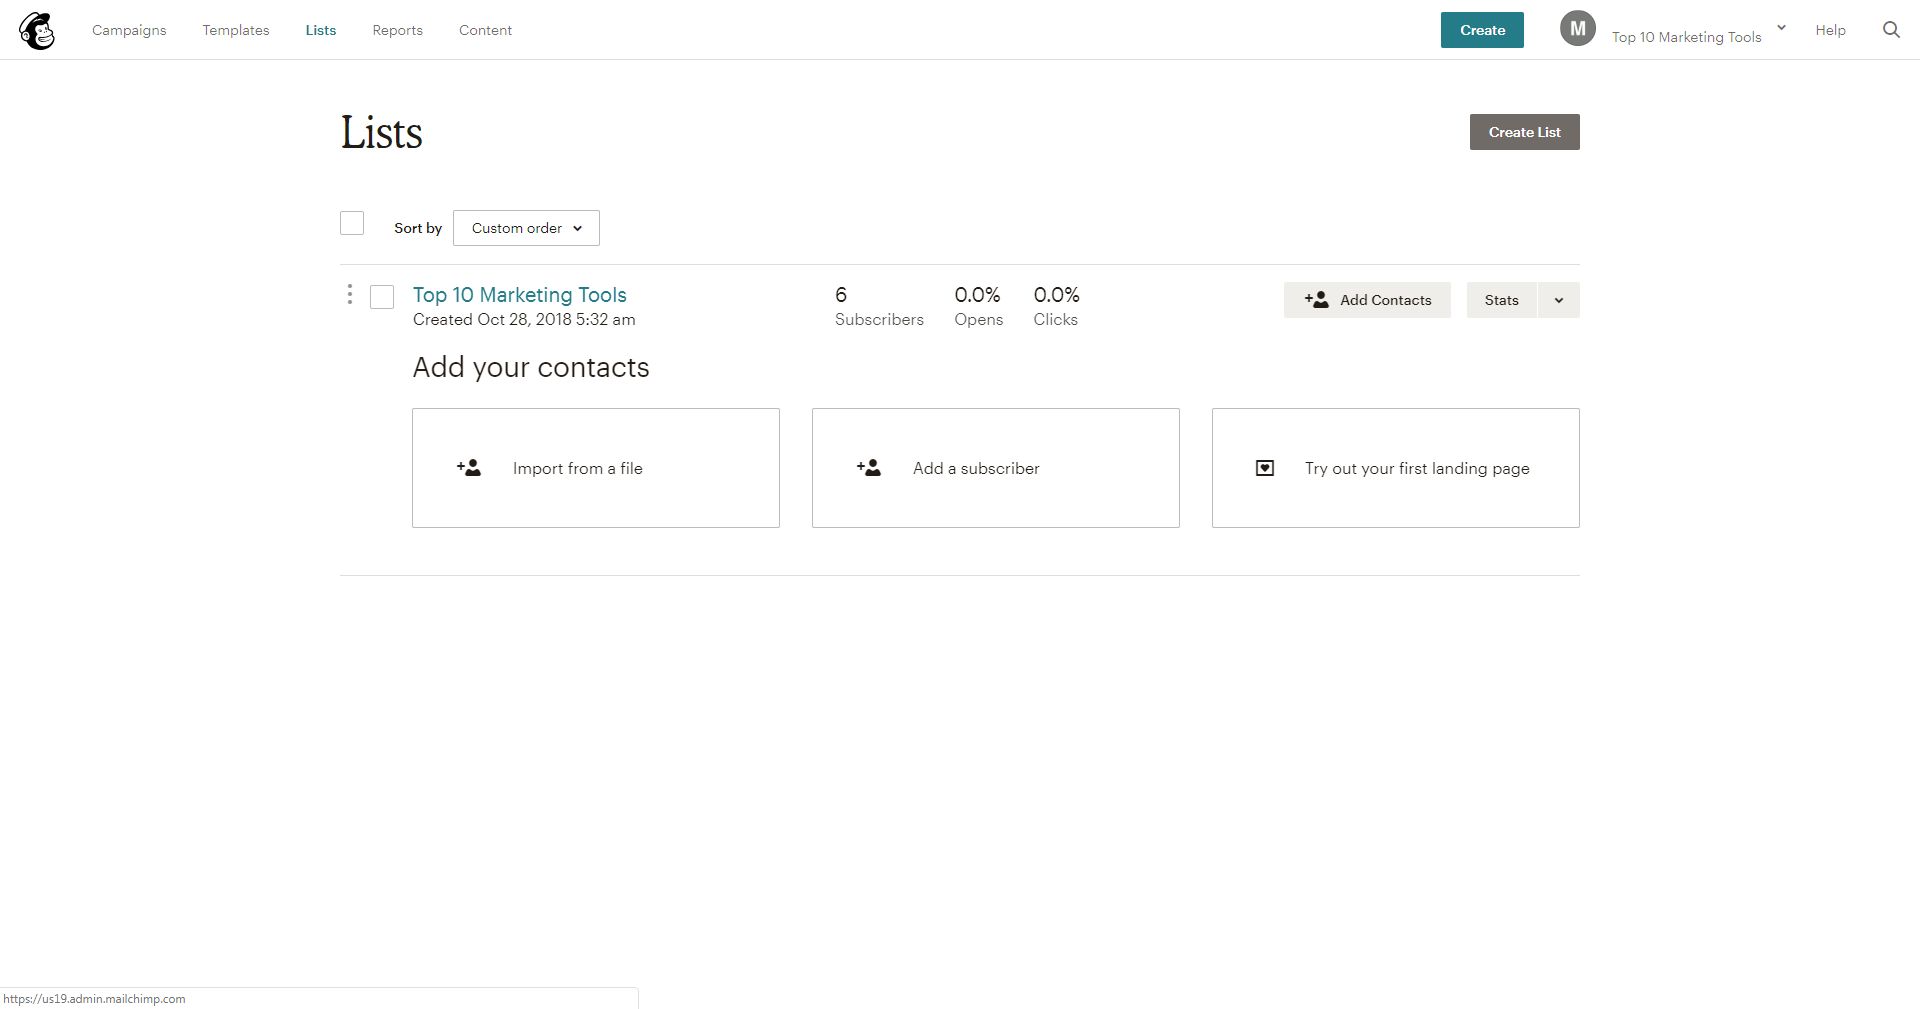
List Management
The Lists section is one of the main menu items available in the Dashboard. Mailchimp users have a very extensive set of available options to manage their contacts and lists, organize their client base in segments, track the success rate of campaigns, import contacts from other services/ platforms and extend the information of their subscribers with publicly available information from social networks.
Import/ Export
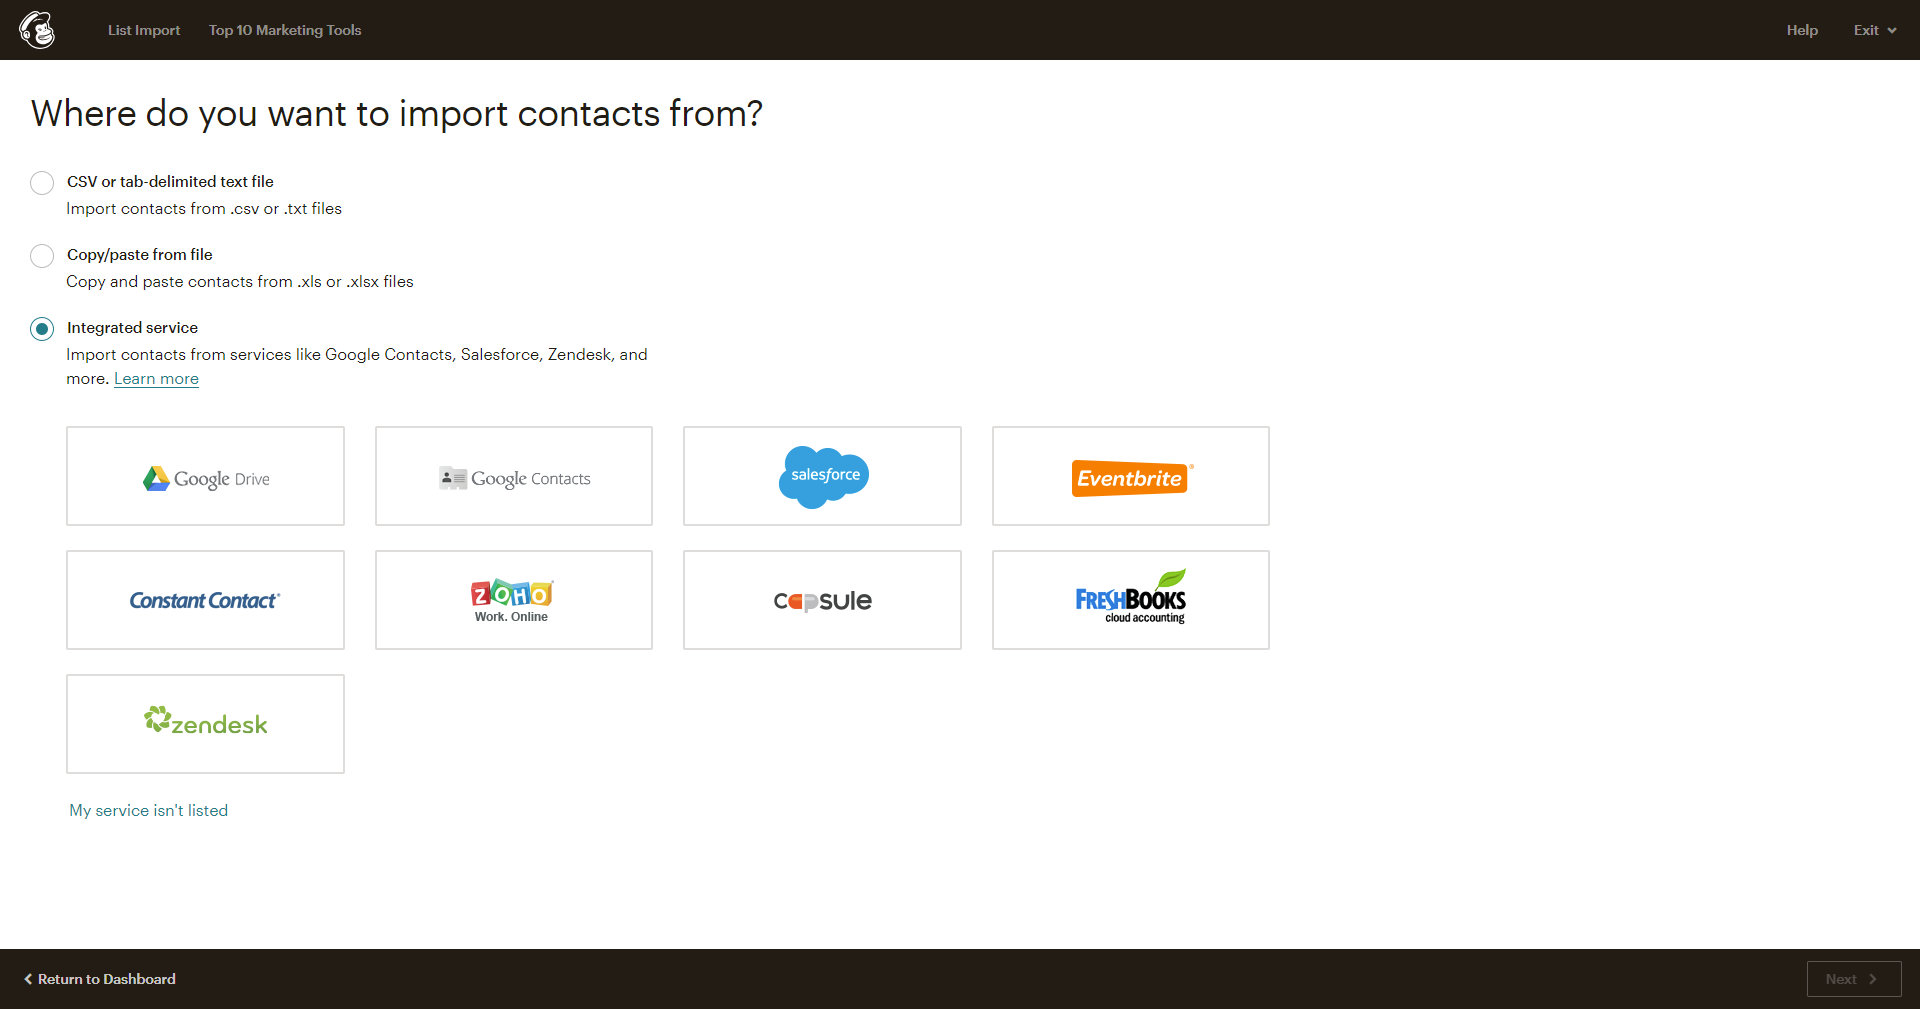
Mailchimp offers several methods to import contacts and lists. You can import files (.csv or .txt), copy/ paste from .xls or .xlsx files, or take contacts from one or more integrated services, like Salesforce, Zendesk, Google Contacts, et cetera. Straightforward and easy to execute.
Exporting a list is as easy, just make sure you choose the right option for your needs – many different options are available! Depending on how you organize your lists, if it includes segments, groups, or tags, for example, you can use these variables to organize or filter your export. Mailchimp exports your list fields and conveniently adds additional contact information it collects, for example, ‘member activity rating’, ‘email marketing status’, IP address, and more.
You can view and/ or download list/ segment exports from the Subscriber exports screen up to 30 days after the initial export.
List expansion
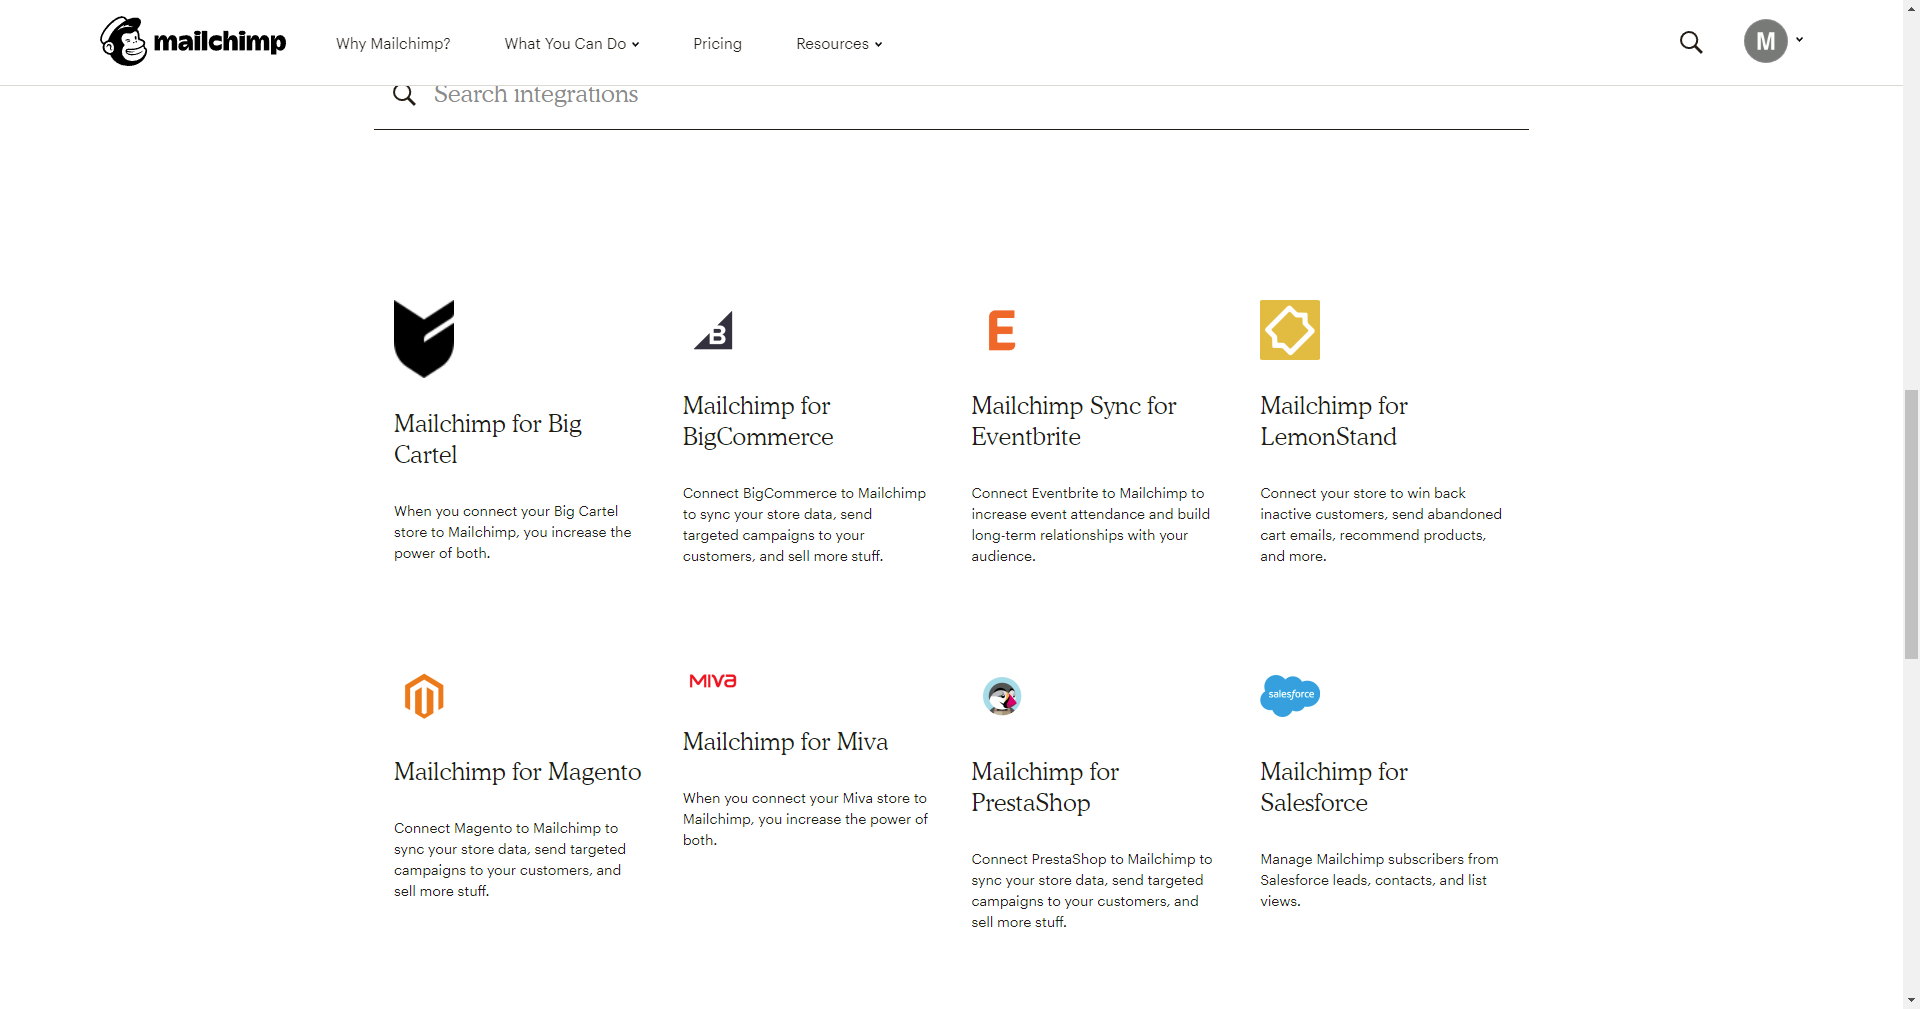
Integration with other apps and platforms can be a great tool to grow your audience. Not just by adding customers from other platforms to your Mailchimp lists, but also by engaging your (existing) audience, or even by reactivating inactive customers or so-called ‘abandoned cart’ cases. The list of optional integrations is large and offers plenty of variety, which gives you the opportunity to try out different things to see what works best for you and your (potential) customers. For example, connect your Big Cartel or Shopify store to your Mailchimp account, or use the Salesforce integration to manage Mailchimp subscribers from Salesforce leads.
Segmentation & Tagging
In order to send better targeted email campaigns, you can use Mailchimp’s ready-made segments to divide your customer base into sensible subgroups that you can set up specific campaigns for. You don’t have to use the Mailchimp segments; you can make your own segments based on what you think makes sense.
Another option to divide your clientele in easy-to-target groups, is by use of tagging. This way of organizing a large base of customers into subgroups is, according to Mailchimp, slowly replacing the regular style of segmentation. Tagging is a very flexible and intuitive way of creating groups within groups, and Mailchimp offers the option of converting existing segments to tags, if desired. You can use tags in more than one way to reach your desired audience, for example from the list section, from the tags section, or from the campaign builder – to name a few options.
Building an Email Campaign with Mailchimp
The campaign building options in Mailchimp are abundant. When you click the ‘Create campaign’ button, a whole new world of options opens up. You can search Mailchimp’s offer of available campaign types, you can choose from a set of standardized options (email, landing page, ad, signup form), or you can take Mailchimp’s main suggestion, which is to send an introductory email to your latest subscribers and set up an automation to follow up on that initial mail – which is a very useful suggestion because it introduces you to a number of features Mailchimp offers – automation being one of them which is particularly handy and important.

Email Templates
Before you reach the phase where you’re actually going to design your email, there are some things you do first. We’ll go over the whole process in the ‘Sending an email’ section below.
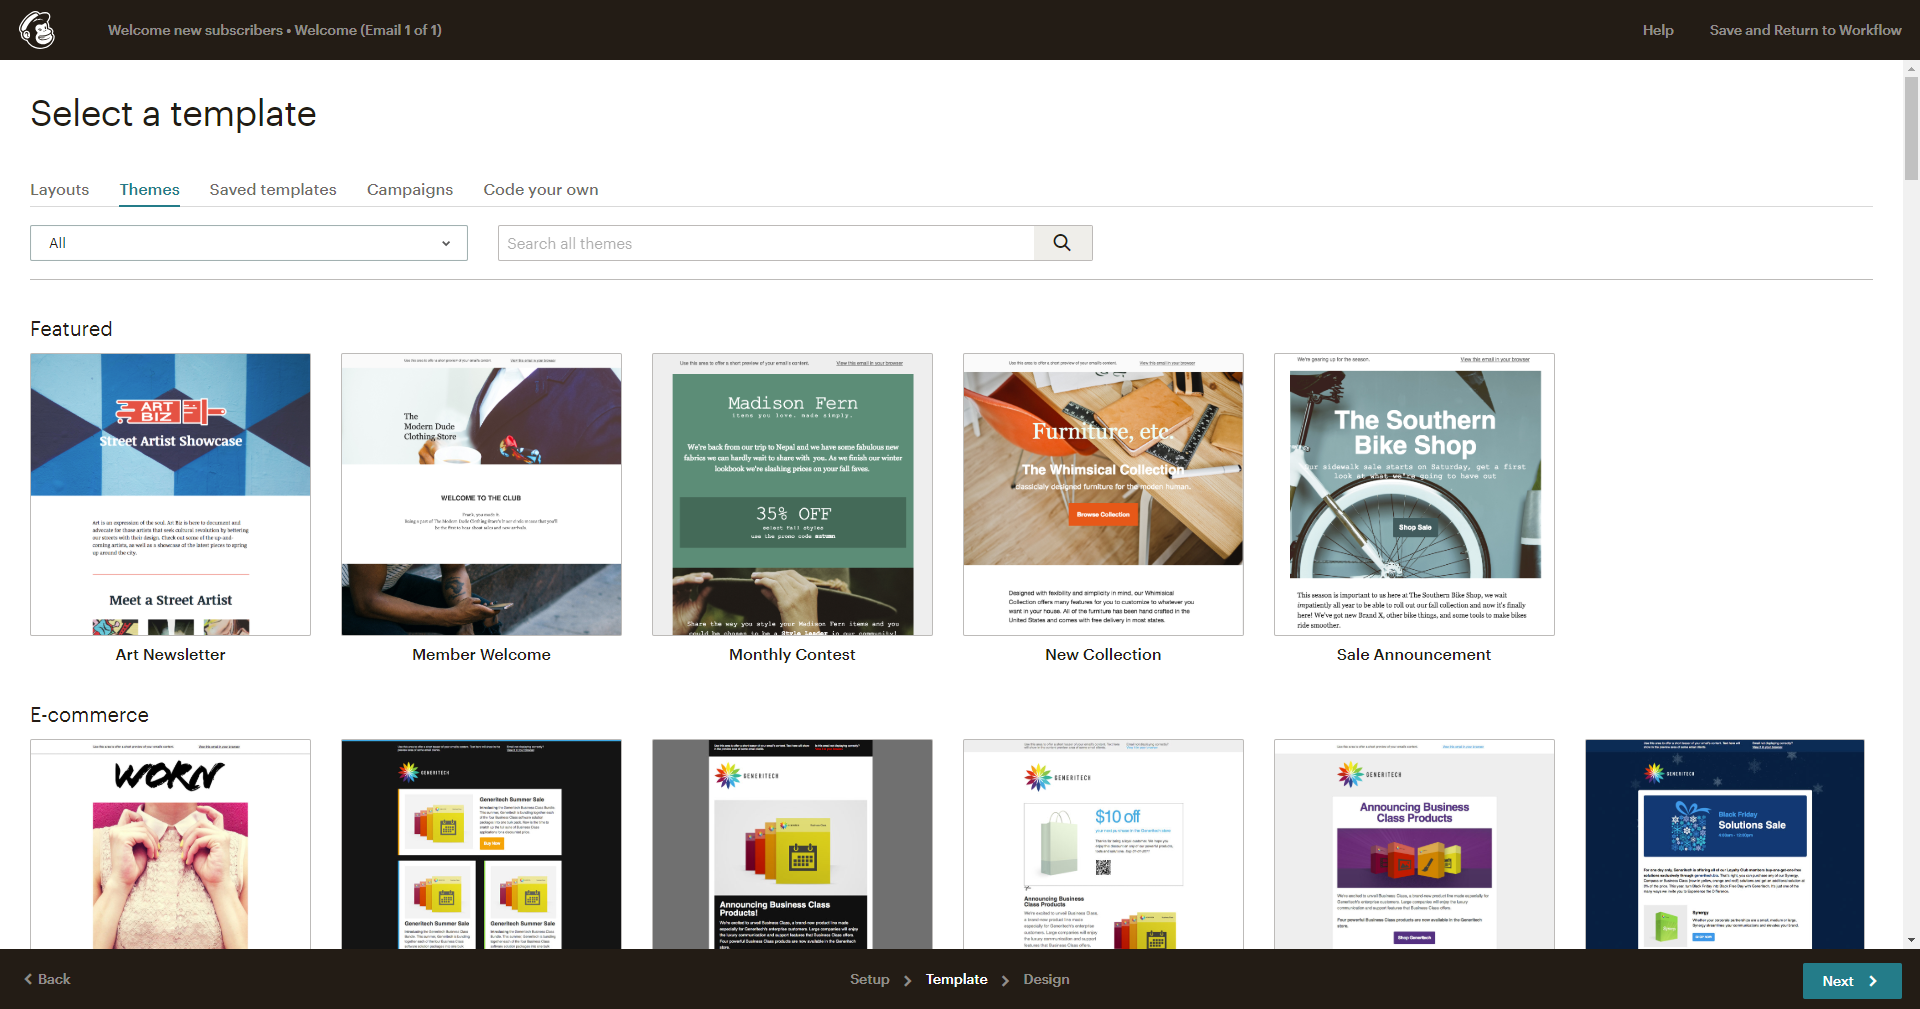
Mailchimp offers customers several ways to build emails. You can pick a template from a set of standard layouts – a basic setup (columns, content blocks, images) that you can use as a starting point. There are several featured layouts that are much more dressed up and developed to serve a specific purpose (sell products, announcements, tell a story, follow up, educate). You still need to add your own text and visual content, but it will be much more pinpointed than when starting from scratch.
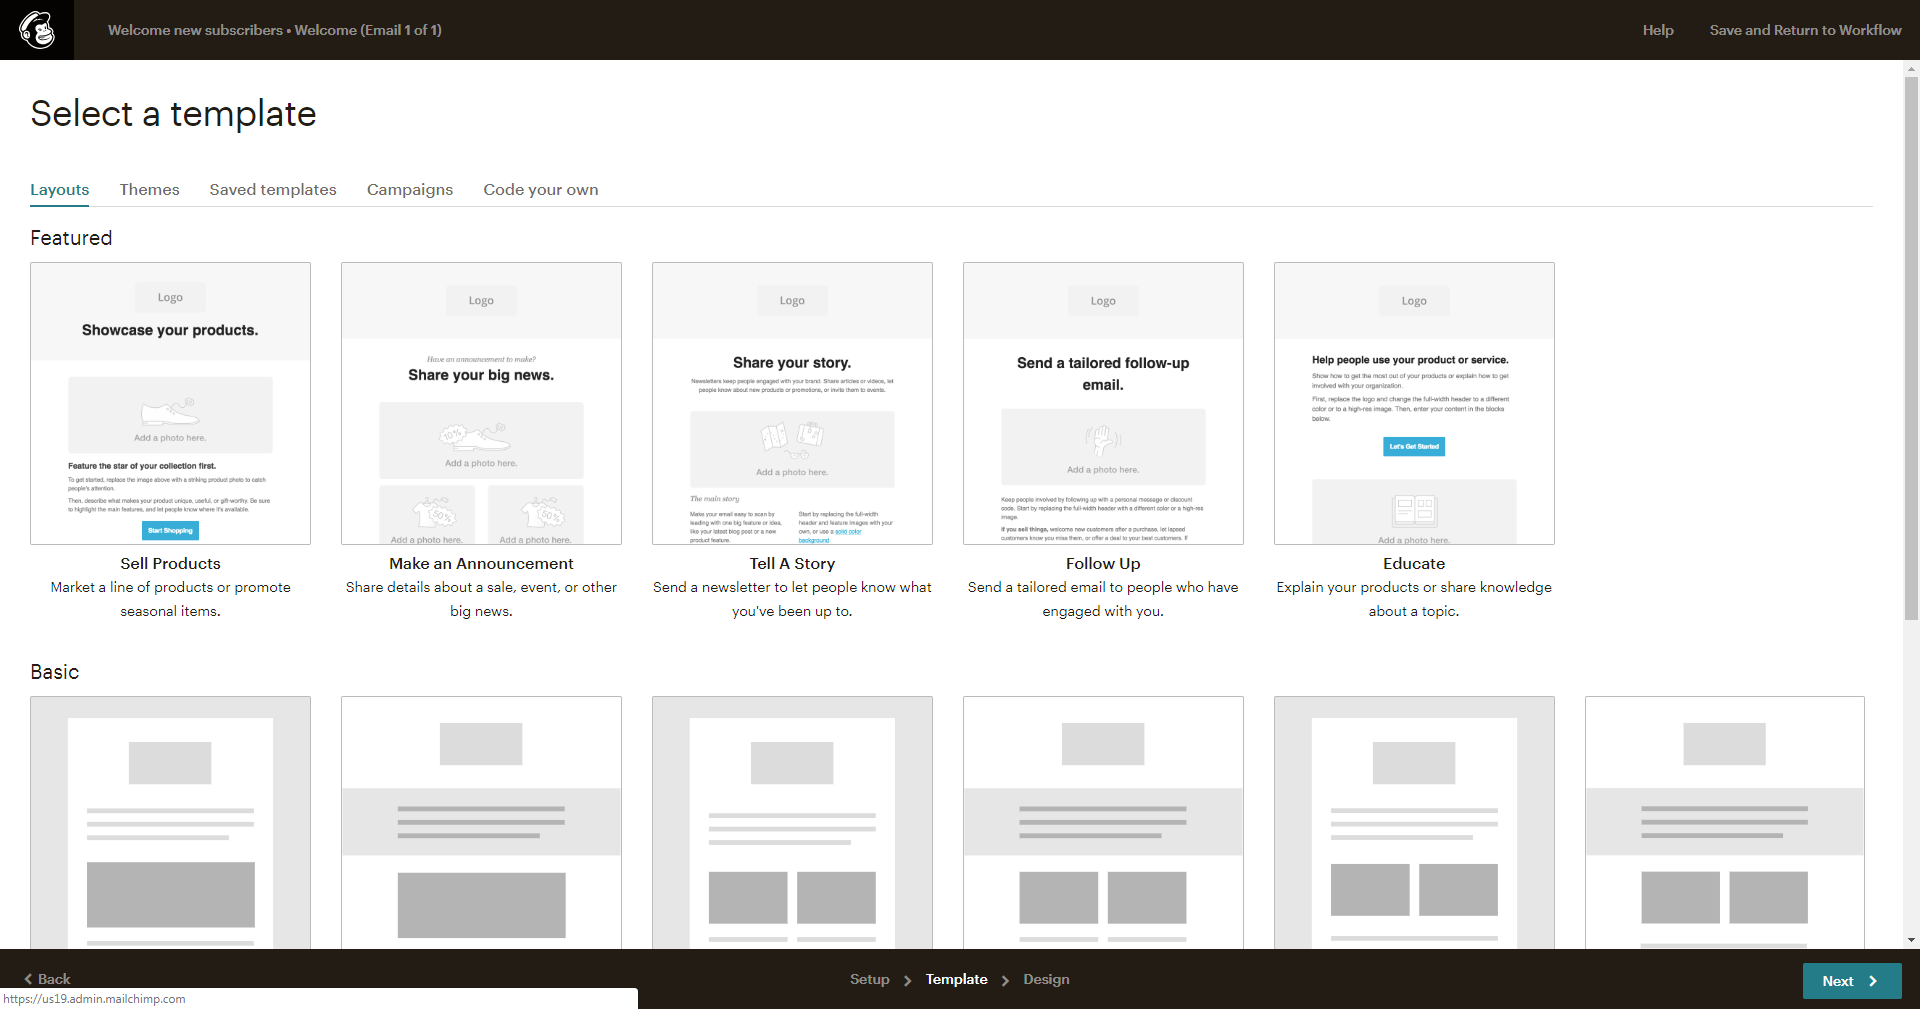
The themes tab offers a variety of templates to choose from, divided into the following categories:
- eCommerce
- Events
- Holiday
- Integrations (using other apps, like SurveyMonkey or EventBrite)
- Newsletters
- Notifications
- Photography
- Stationery
- Subscriber alerts
You can save your designs and campaigns to use them again later. Designs you save, are accessible through the ‘Saved designs’ tab; saved campaigns you’ll find in ‘Campaigns’ tab.
If you prefer to use a code editor to build your emails, you can do so in the ‘Code your own’ tab, which offers you the option to paste a coded design, import the HTML code from a zip file, or import it from an URL.
Drag & Drop Editor
As explained in the previous paragraph, the Mailchimp Drag & Drop editor works well. It’s easy to work with and responds well. When working with existing themes, which is likely the popular option for most users, you’ll find out that options are not without limits. You can drag elements, but you cannot drop them just anywhere. Such limitations may seem restrictive, but will ensure your final design looks professional and contains a clear message.
The editor offers all the features users come to expect from a drag & drop system, including video (YouTube & Vimeo), images, social sharing & following options, CTA buttons, et cetera.
The Mailchimp drag & drop editor offers two ways to further develop designs: you can work from a content or from a design perspective. One option doesn’t exclude the other, and the available options for both differ a bit, so in order to really improve a design, you should definitely use both the content and the design point of view.
You can involve others in the process by inviting them to check the design and give feedback.
Mobile Editor
All of Mailchimp’s templates are responsive, so they automatically adjust to the device you’re using to view the email. However, you can edit the way the email is displayed on mobile devices by using the ‘mobile styles’ feature in the design tab of the drag & drop editor to optimize the mobile view.
Sending an email
When starting a campaign, the first thing to do is choose the purpose of the campaign. Let’s say you decide to go for the introductory campaign. For an introduction, the “Connect with your audience” is the matching option offered.
Note: you see that this email is actually part of an automation , but for now, we’ll focus on the first email and park the automation part until we reach that section in this review.
Obviously, looking at the purpose of the chosen campaign , you now opt for welcoming your new subscribers.
As far as settings go, it makes sense to leave the default settings as they are. This particular email will be sent exactly one day after the subscriber registered. Moving to the design part (using the ‘Design Email’ button in the right upper corner, we first have to set the initial details of the email we want to send out: name, subject, preview text, from name, from email address.
Now, you’re ready to start designing your email. You have several options to choose from to help you design your mail. In the ‘Layouts’ tab, you can choose a layout, while the ‘Themes’ tab offers a variety of templates you can use as a starting point.
The features theme ‘Member Welcome’ seems an appropriate choice for the welcoming new subscribers purpose.
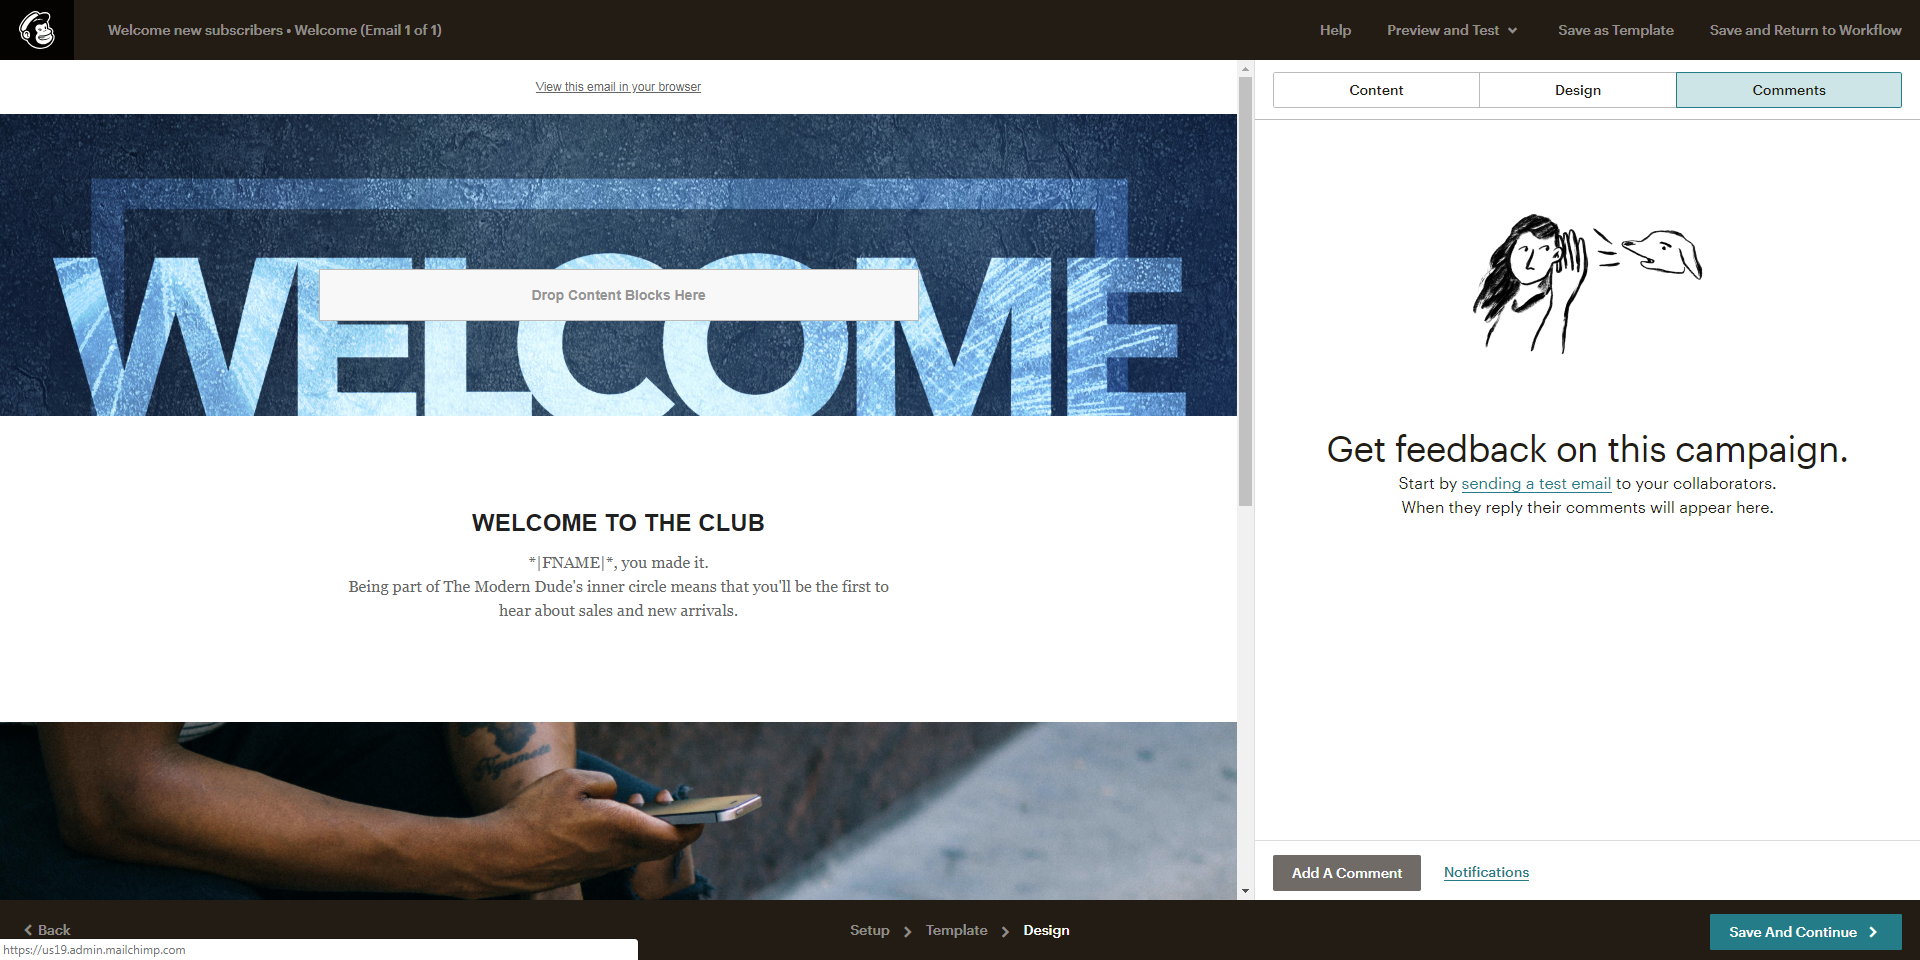
You can further mold the design to your specific vision from two perspectives: content or design. In both cases, you can make changes to the initial theme as much as you want. Some things, such as removing, replacing, or editing images from the theme design, you can only do from the design tab, while others (adding video, for example) can only happen from the content side, but both options offer plenty of ways to add your own touch.
You can upload your own images and logo(s), you can connect your Facebook account so your Instagram pictures show up in the Content Manager, Mailchimp’s name for the image library. You can also connect your e-commerce store, so that you have access to your product portfolio images via the Content Manager.
Once you’re done designing, you can ask your collaborators for feedback by sending them a test version of the mail. Their remarks will show up in the Notifications tab.
Before you start sending, check the process once more with the handy overview Mailchimp offers you. If everything is ok and no further editing is required, click the ‘Start sending’ button in the lower right corner.
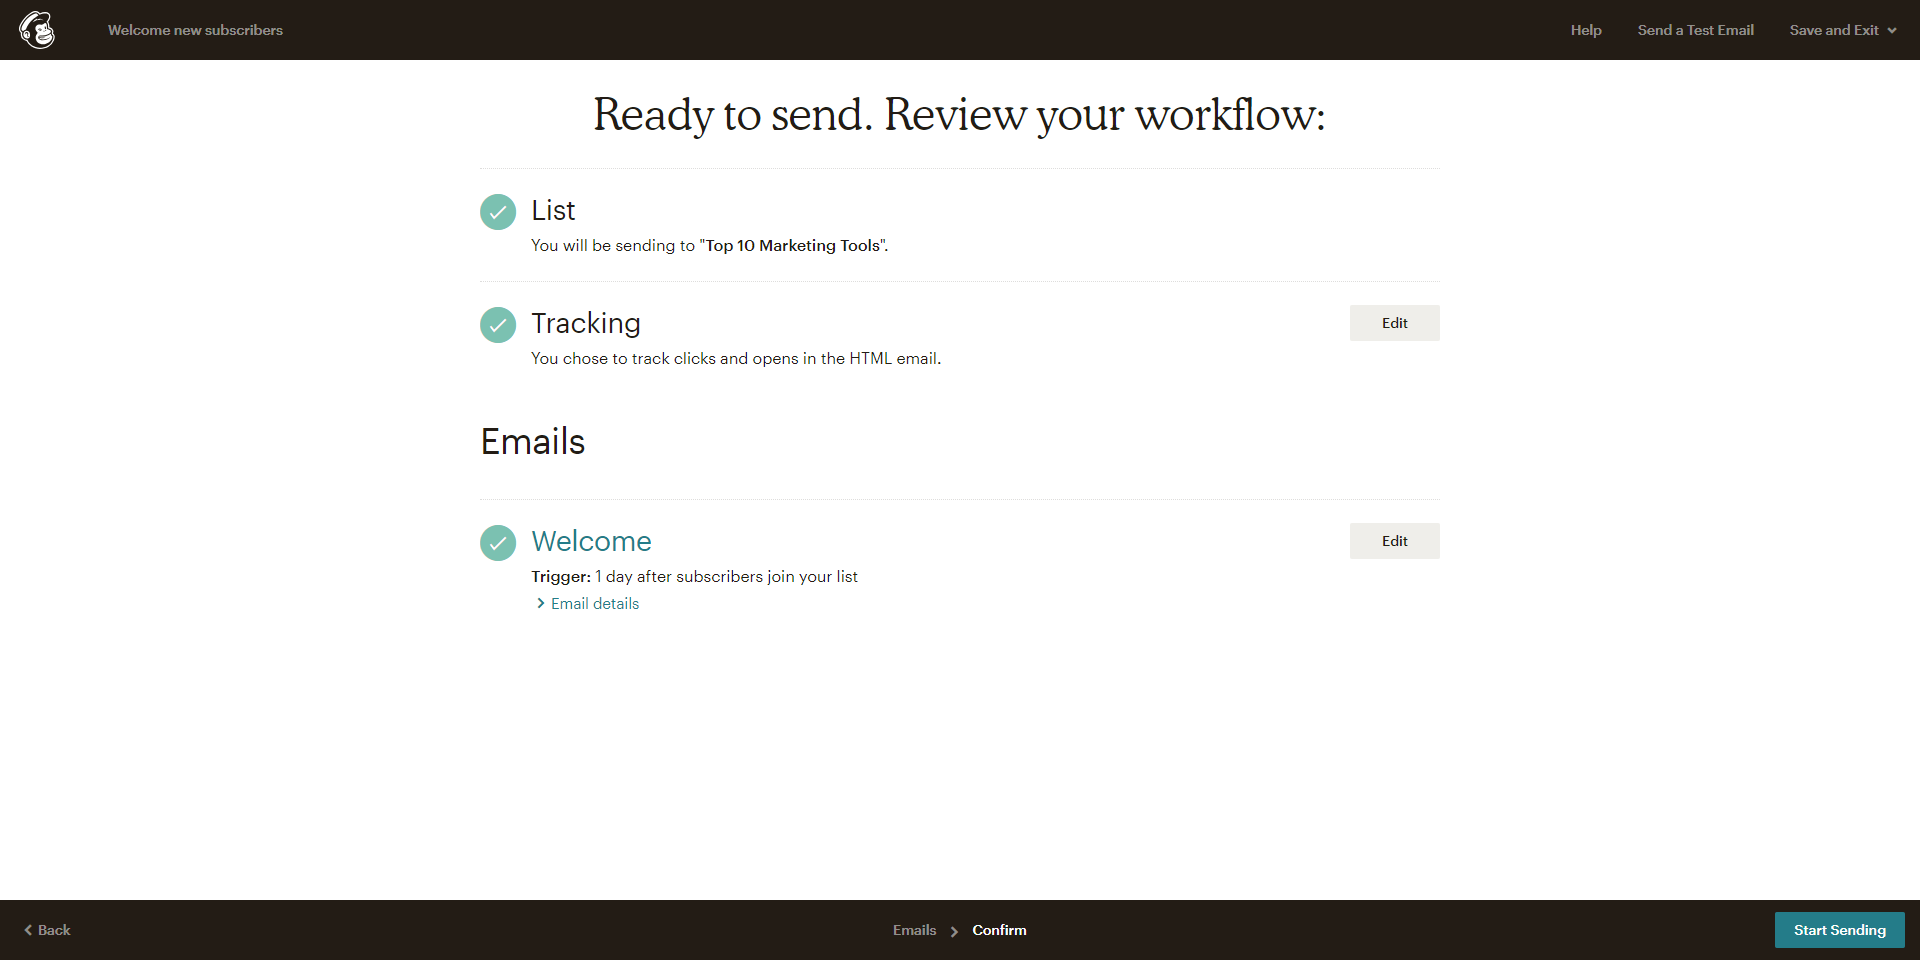
You can schedule emails to be sent out at a specific time, and if you use segments or tags, you can target a specific group of people. You set those details in the campaign settings.
Automation/Workflow
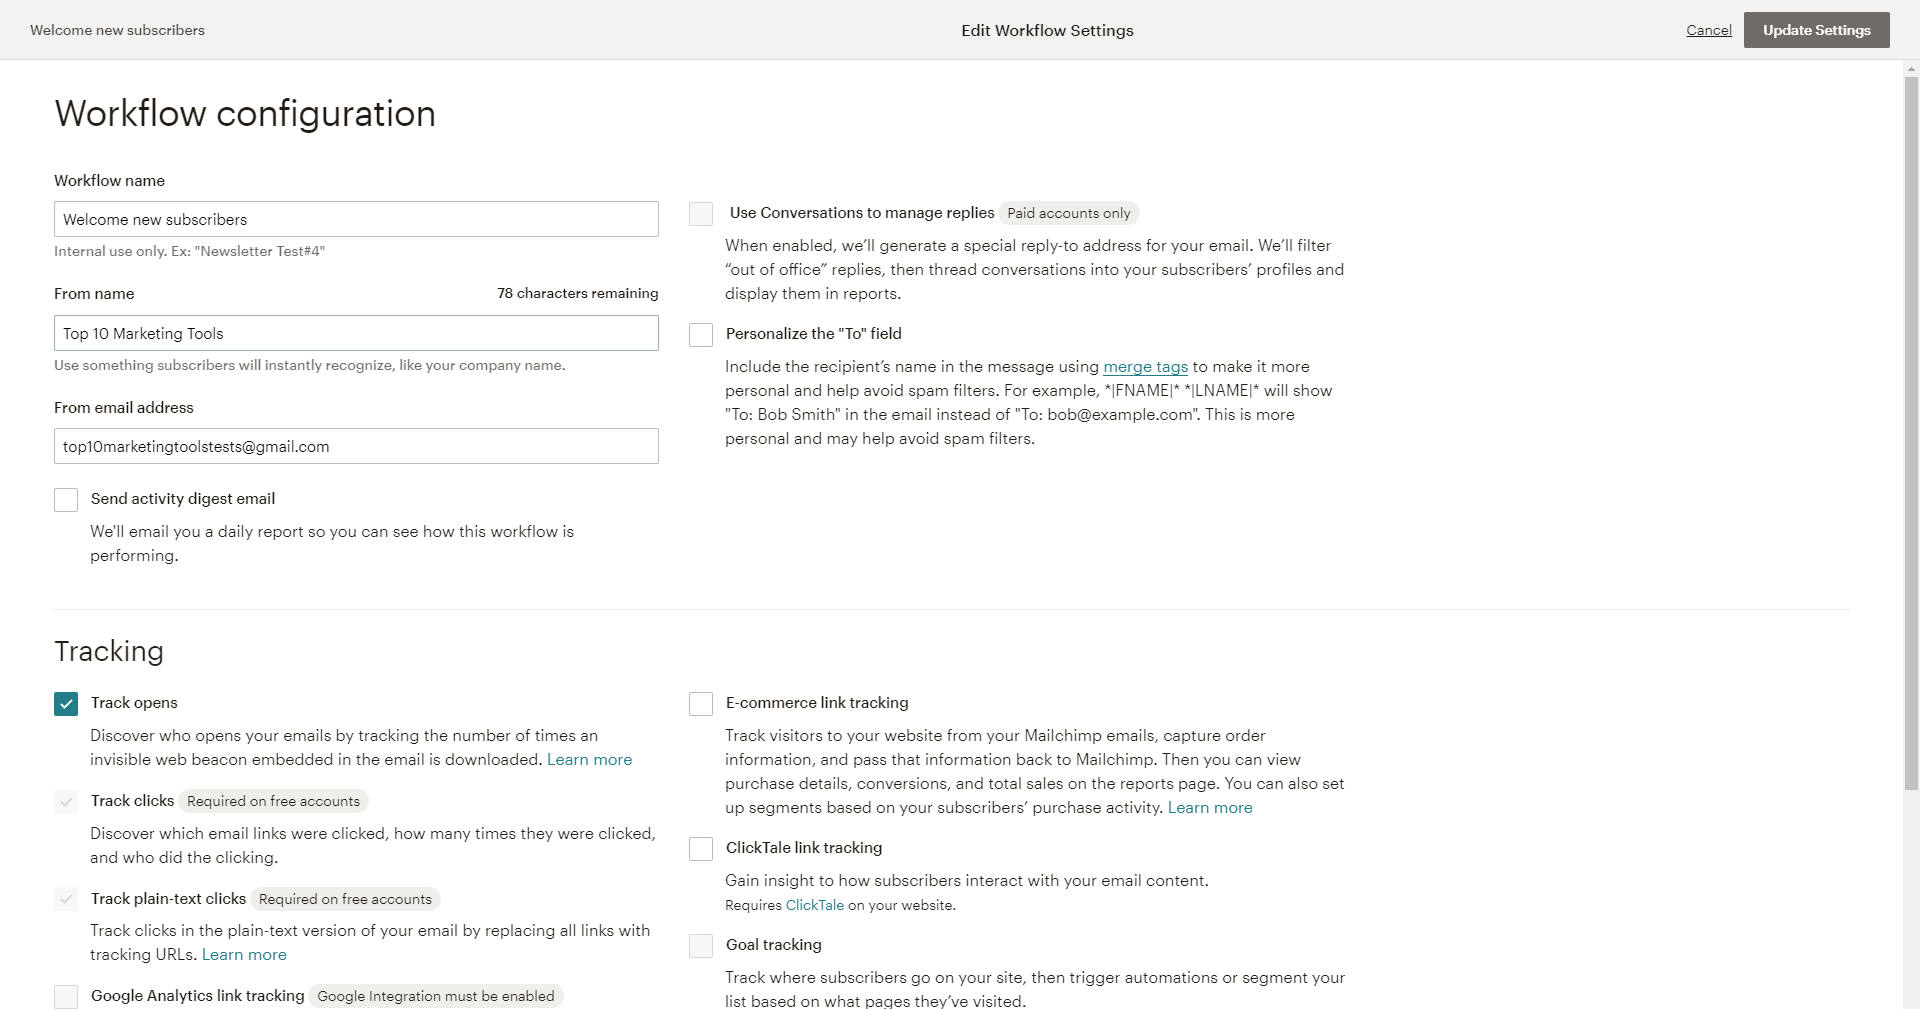
Automation options in Mailchimp are great and Mailchimp urges you to make use of these options. When setting up a campaign, the first thing you notice is the focus on outlining the whole process. What is the purpose of the campaign? Does it involve following up on the initial email? How many times? And if you are segmenting, which segments require what follow-up? It is very easy to add emails to a campaign and assign those emails to a specific target group, with a specific schedule for sending the mails.
You can configure the workflow, which you only have to do one time and counts for all the emails in the automation sequences. You can also set the tracking options in this configuration. For free accounts, opens, clicks and plain text clicks are tracked (required for free accounts), as are e-commerce links. Other options require integrations with third party apps or other conditions.
Setting up an automation sequence in Mailchimp is very easy. You already sent your new subscriber a welcome email, now you need a follow up action. Everyone who received the first mail, will get another email, exactly one day after the first mail.
Let’s add another email so we can take a look at the options.
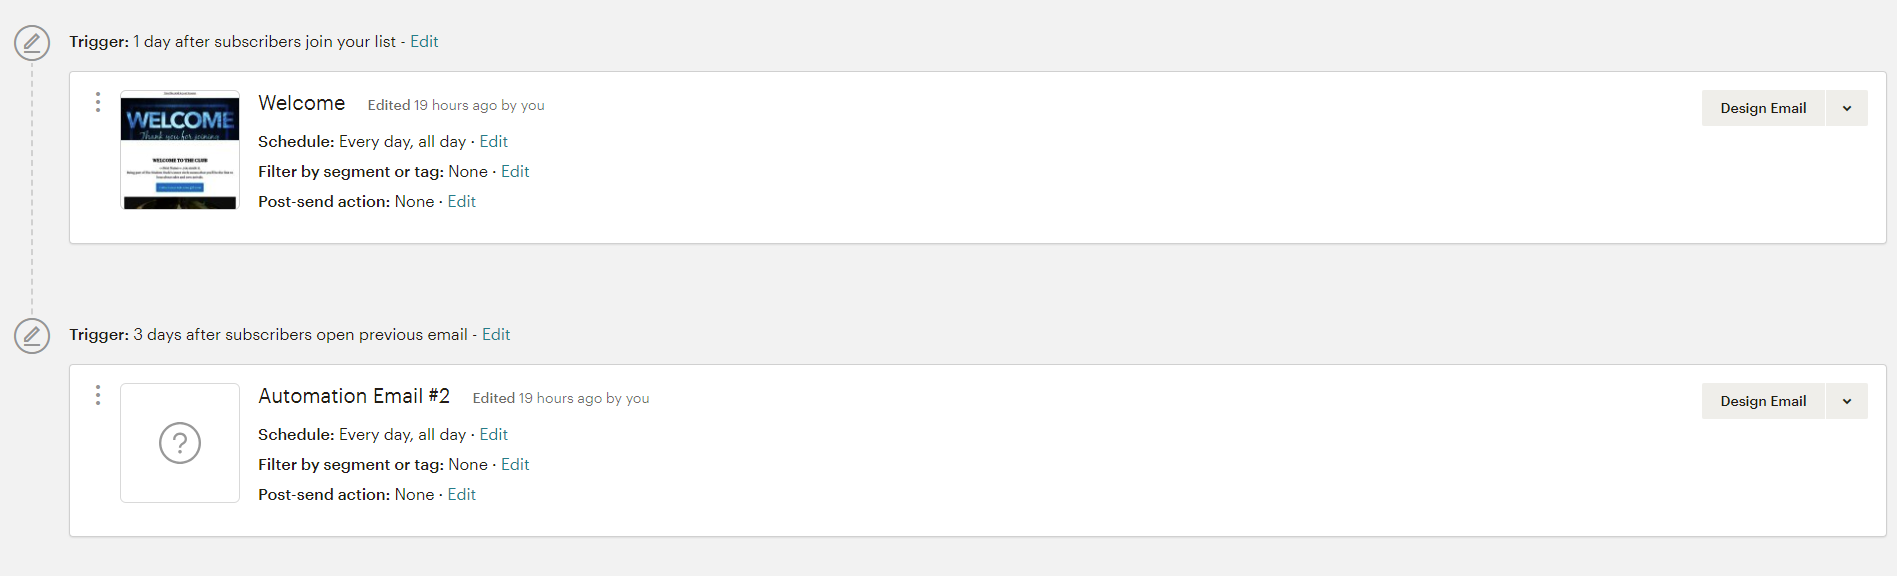
Mailchimp lets you choose from all kinds of possible triggers: opens, clicks, specific link clicked, and also more specific triggers, connected to a campaign you’re running, or to an e-commerce related event or activity, or a specific product. Several interesting standard automation options are available, for example: abandoned cart, rss-to-email (for automatically sharing your latest blog posts), product recommendations to boost sales, order notifications, and so forth.
The automation system works in a serial manner, not parallel, meaning that if you want to email both the people who opened your first email and the ones who didn’t, you need two automation sequences. A new email always follows the one right before it, and the trigger relates to that previously sent email. You cannot set a trigger to an email before the last one you sent (unless it was the first one in the sequence). This actually prevents an automation sequence from getting very complicated – but it depends on a user’s preference if it is an advantage or the opposite.
Tracking & Optimization Tools
For tracking purposes, Mailchimp offers a variety of tools and options. Everything your customers do, is tracked. You can use all that data to optimize your marketing efforts. Mailchimp’s various reports give you a deep insight into the behavior of your audience and tell you which type of content works for which segments. Growth, engagement and revenue reports give you the necessary information to tailor future campaigns to suit the needs of your clientele. On top of that, you have the option to monitor your marketing campaigns (emails, automations, social ads, et cetera) real-time, straight from your Mailchimp account. This will give you a good idea of which of your efforts are working well and which ones need optimization.
Email tracking
- Email tracking options include:
- Opened/ not opened
- Clicked/ not clicked
- Specific links clicked/ not clicked
- Bounced emails (plus bounce reason)
- Forwarded emails
- Unsubscribes
A/B testing
Testing out different email setups to see which option works best for a specific segment is always good. For this purpose, you can use Mailchimp’s A/B testing feature. You can try out different subject lines, images, complete layouts, and use different send times to optimize an email for the target audience.
Inbox checker
To make sure your email displays as intended, you can use the ‘Inbox Preview’ to get an idea of how your email looks in different email clients. Monthly users receive 25 Inbox Preview tokens per month, while Pro users receive 100. This feature is not available in the free account option.
Apps/ Integrations
| Apps/Integrations | Yes/No | Specs |
| Shopify | Yes | Connect Shopify to sync your store data, send targeted campaigns to your customers, and sell more stuff. |
| Google Analytics | Yes | Enhance tracking, reports, and integrate lists. |
| Salesforce | Yes | Integrate CRM records with Mailchimp lists. |
| GoToWebinar | Yes | Create events and tasks automatically. Connect GoToWebinar and MailChimp. Run workflows. |
| WordPress | Yes | IntegralWP, the Mailchimp plugin for WordPress, offers abundant options to connect the two platforms: sync subscriber data, add signup forms, design and send campaigns from WP, etc. |
| Yes | Add a signup form to your Facebook Pages and auto-post campaigns. | |
| Slack | Yes | Receive updates in Slack when people subscribe and unsubscribe from your lists, and see the status of sent campaigns. |
| YouTube | Yes | Connect your Mailchimp account to your Attentive.ly account and engage your Mailchimp contacts on 100+ social media platforms, among which YouTube. Additionally, embed YouTube videos in your email campaigns. |
| Yes | When you connect your Facebook account with your Mailchimp account, you can instantly use your Instagram images from the Content Manager image library. | |
| Zapier | Yes | Zapier’s Mailchimp integrations allow you to automatically pass data to and from other web services without writing a single line of code. |
| PayPal | Yes | Through Automate.io, it is possible to connect Mailchimp and PayPal to gather leads and automate marketing and sales processes. |
Additional Marketing Services Offered
Mailchimp offers a few nice extra features that users can benefit from:
- Landing pages
Mailchimp comes with the option to build and launch landing pages, a great marketing tool. The available drag & drop editor is basically exactly the same as the one you use for building your emails, including the content and design options. - Languages
If you’re targeting (potential) customers in different languages, you can make good use of the automatic translation option Mailchimp offers. A long list of languages is supported for this purpose. Translations are based on Google Translate, so it can result in poorly translated content. Since it is an automated feature that offers clients the option to choose another language, you can’t control the translation quality. - Mailchimp mobile app
Monitor campaign data real-time with Mailchimp’s mobile app, to be on top of all the latest developments even when you’re out of the office. Check your key numbers in one glimpse and receive alerts in case of a sale.
Support
The section Resources, part of the main menu of Mailchimp’s corporate website, offers the first line of defense in case you run into problems with the email marketing platform. It is part information and useful tips to get you on the way (Mailchimp 101 and Guiden & Tutorials), and part inspiration on how to actually make good use of the platform (Success stories and Marketing tips). In case you cannot find the necessary info, you can resort to contacting Mailchimp Support, which will first lead you to a searchable knowledge base, and secondly (a bit lower on the page) to the option to talk to the Support team, either by email or via live chat.
Additionally, there is a ‘Help by Topic’ section that covers the most common problems customers experience, and when none of the available options solve your issue(s), you can ‘Hire an Expert’. Mailchimp hosts an expert directory that you can access in case you need extensive help with a specific issue you don’t manage to solve in any other way.
Packages/Pricing
As a Mailchimp user, you can choose between three optional packages: Free, Grow or Pro. In the Free option, you can have up to 2,000 subscribers, and send up to 12,000 mails per month, but mails will always contain the Mailchimp logo in the footer and support (email & chat) is only available the first 30 days.
The list of features that are part of all three packages:
- Email campaigns
- Landing pages
- Pop-up forms
- Postcards
- Google remarketing ads
- Facebook ads
- Instagram ads
- Marketing automation
- Abandoned cart
- Product recommendations
- Order notifications
- Welcome emails
- Data-based automations
- Segmentation & tagging
- Basic reports
- A/B testing
The features that are not included in the free account option, but are part of the Grow and/or Pro plans, lie mainly in the Optimization area:
- Send Time Optimization
- Delivery by Time Zone
- Predicted Demographics
- Advanced Segmentation (Pro only)
- Comparative Reports (Pro only)
- Multivariate Testing (Pro only)
- Email and Chat support
- Premium support (Pro only)
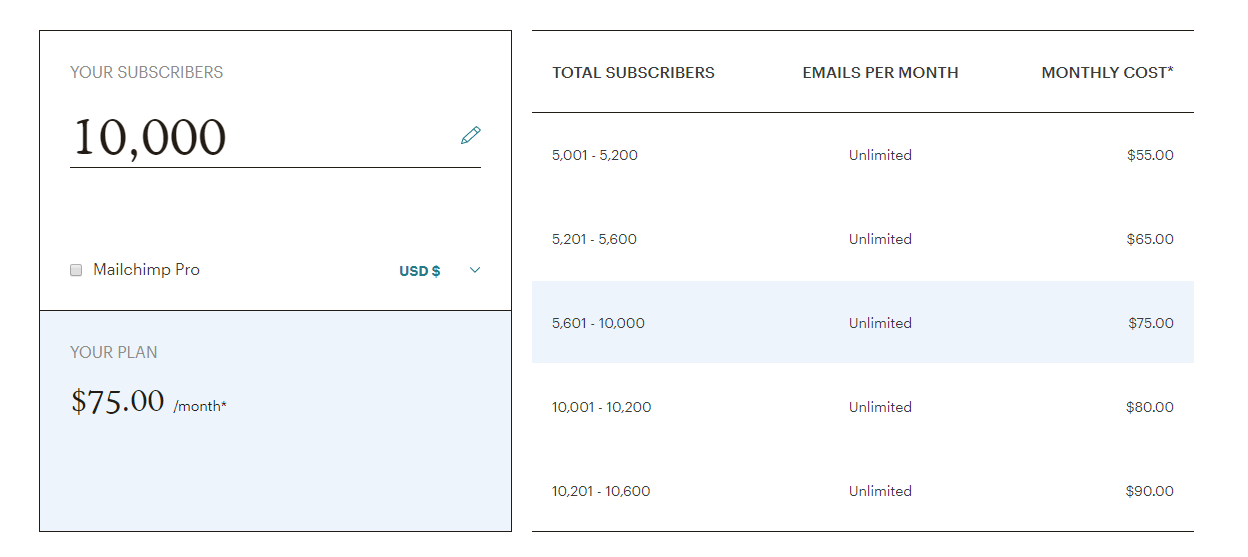
Pricing of the Grow package starts at $10 per month (which is the price for up to 500 subscribers) and depends on the number of subscribers, with the side note that the number of emails you can send is always unlimited, for any paid plan option. A Pro account costs $199 per month, these are set costs that come on top of the monthly bundle you’re using.
The Grow plan does not have a set monthly fee – as a Grow user, you only pay the bundle fee.
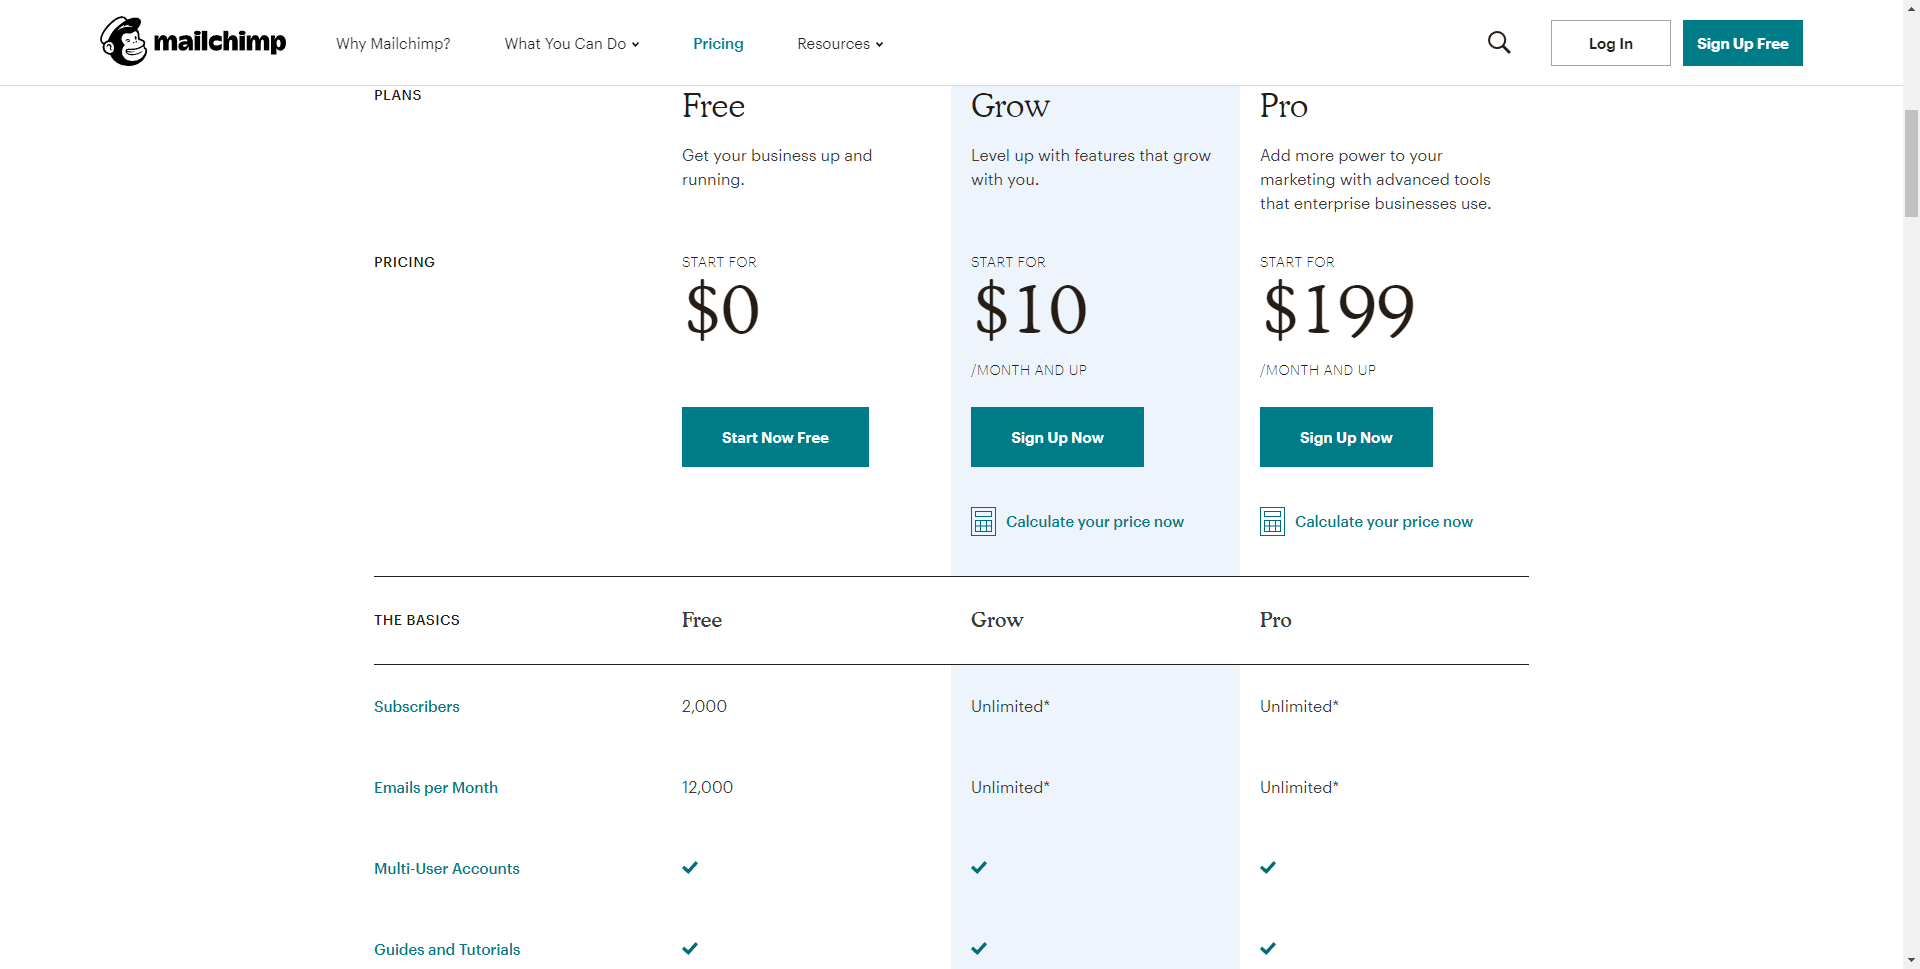
If you are not sending emails on a regular basis, you can opt for buying email credits. You buy a bundle, starting from 5,000 email credits ($150) and use it whenever you want. You can still purchase the Pro subscription to go with your credits, which will add an additional monthly fee of $199 to the one-time price of the email credits.
Pros & Cons
Pros
- Dedicated real-time mobile app
- Wide range of integration options
- Extensive automation options
Cons
- No support for free accounts after first 30 days
- No open tracking for plain text emails